1) Microcomputer control, menu operation, large screen LCD dot matrix display, stable performance, belongs to intelligent instrument.
2) It has strong anti-interference ability and is suitable for measurement in strong electromagnetic interference environment.
3) There are 7 voltage output gears, including 50V, 100V, 250V, 500V, 1.0kV, 2.5kV, 5.0kV.
4) The output high voltage can also be adjusted continuously from 0V.
5) It has strong load carrying capacity and short circuit current is about 5mA.
6) The maximum measuring range is 0 ~ 10TΩ, and the measuring range is automatically switched.
7) The combination of analog bar pointer and digital display shows the change trend of data and accurate measurement results.
8) The test time is displayed at any time.
9) After the measurement, the high pressure is automatically released, and the high pressure relief time is not more than 30 seconds.
10) Automatic measurement of ambient temperature, air humidity and the date and time of each test.
11) In the non test state, there is no operation for 5 minutes, and the instrument prompts to shut down.
12) It has comprehensive protection function and high reliability.
 Operation method
1. After the test line is connected correctly, turn on the power switch on the panel, and the LCD will display the welcome interface as shown in Figure 1, showing the current temperature, humidity and time.
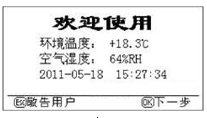
Figure 1
2. At this time, press the OK key, and the function selection window as shown in Figure 2 will appear. It can be operated according to the button function prompt at the bottom of the screen. Press the ESC key in the interface of Figure 1 or figure 2,
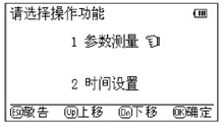
Figure 2
When the notice window appears, the system prompts that the safe operation regulations must be strictly implemented (see bold font on the fourth side of this manual). As shown in Figure 3, after about 4 seconds, return to
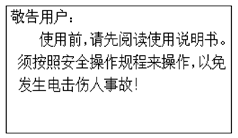
Figure 3
Figure 2 function selection window. When the parameter measurement is selected in the interface of Figure 2, the system appears
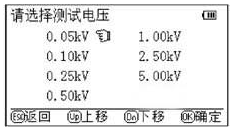
Figure 4
Test voltage selection interface, as shown in Figure 4. Select the test voltage and confirm, and the confirmation interface of pressurization measurement will appear as shown in Figure 5.
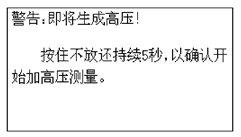
Figure 5
In order to prevent mistakes in operation, the system requires the user to hold on for 5 seconds. If you release the button within 5 seconds, the system will return to the voltage selection interface in Figure 4. If the button is not released within 5 seconds, the pressurization prompt window as shown in Figure 6 will be displayed. Warning: pay attention to safety at this time.
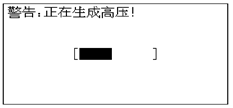
Figure 6
After the high pressure rises, the interface as shown in Fig. 7 appears. The interface shows the test time, insulation resistance and test voltage. The system timing automatically.
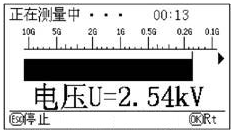
Figure 7
Press the OK key to view the current resistance value, as shown in Figure 8;
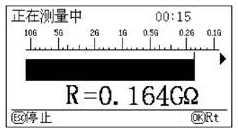
Figure 8
3. After the test, press the ESC key to stop the high-pressure output and the system will release automatically
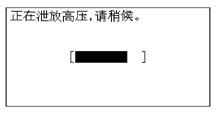
Figure 9
4.4 in the interface shown in Figure 2, if you select the time setting operation, the time setting interface will appear, as shown in Figure 10. At this time, the system time can be modified.
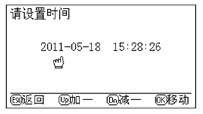
Figure 10
4.5 When the instrument is working, do not cover the temperature and humidity sensor on the panel to avoid inaccurate temperature and humidity measurement. Don't cover the buzzer to avoid poor pronunciation.
4.6 adjust the contrast knob to adjust the LCD display effect to the best.